FireCheetah returns
Last year I participated in the Abingdon firefighting robotics competition, in which a robot must navigate a maze, find a candle, and put it out. We entered two divisions: K-6 where kids are allowed to remote control the robot, and the senior division where all actions must be autonomous. The kids won their division, but I did not do so well in mine. Ever since then I have been thinking about a rematch. Now the time has come.
For the previous contest I only had two months to build a robot from scratch, order all the parts, learn the firefighting paradigm, figure out a wiring system, get a software environment set up, and ensure that the robot could perform in both autonomous and non-autonomous mode. Two months is not a long time for all of this, and after a lot of sleep deprivation I was proud to get something together that nearly worked. Now I have the luxury of more time, and only need to make improvements instead of starting from the beginning.
A better drivetrain
One of my biggest problems last year were the motors. I used Solarbotics GM8s with matching encoders, wheels, and mounting brackets. Although they were supposed to be a set, they never fit together very well. The encoder connectors were so frail I had to make my own. The motor did not fit square in the bracket (Solarbotics suggests drilling out the case a bit…rather annoying for a custom part…also didn’t work perfectly). The wheels were too thin to navigate the carpet. The motors were extremely sensitive, even a short stall rendered them unreliable for hours.
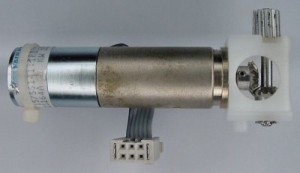
So I decided to start with a high quality motor, then try several wheel options connected to the shaft with a hub. At the competition it was suggested that I use a Faulhaber motor and I found these on Goldmine for only $12 a pair. It has a high quality encoder built in and integrated with the main motor connector.
These are right-angle output gear motors that come with a gear attached to the output shaft. My hex keys were unable to remove it, and the one that I special ordered also failed. I finally used my Dremel to carefully cut into the set screw and get that gear off. In one case I unfortunately nicked the output shaft, rendering that motor incapable of fitting tightly with the wheel hub, but I had spares and the others were successful.
I bought a number of different wheel systems to test but have started with the Lynxmotion hub. This has a set screw to keep it on the output shaft. I learned that most motor output shafts are not perfectly round, but D-shaped, and it is very important to put the hub set screw on that flat area, otherwise it won’t grip properly and the wheel spin will not be true. For wheels, again there are many options. I am starting with a neoprene set that is thicker and slightly smaller than the ones from last year.
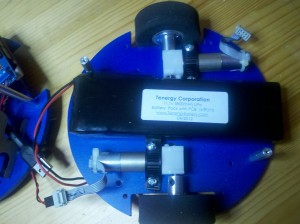
Finally, I had to figure out had to attach the motors to the platform. With the right-angle gearbox in place I cannot access any of the screw holes built into the motor. After some failed experiments I was able to use a technique from The Robot Builder’s Bonanza. I drilled some holes in a plastic strap and screwed it down snugly over the circular motors. Normal screws did only a so-so job, thus I ordered longer screws from McMaster Carr — a great hardware resource as their shipping charges are modest and they get items to you fast.
The big honking battery in the middle works very well but is also heavy and probably more voltage than I need. I have some much smaller 7.4V LiPos to try.
Early results are very promising. Here is a video of the robot doing circles on my office rug. With the Solarbotics setup it was never able to move here. And this is without any casters installed — the platform is dragging on the carpet!
Using the Arduino Eclipse plugin
Aside from the motors, software bugs were the other large problem. Indeed, a last-minute error there killed FireCheetah’s navigation in the competition. Navigating to the right software file to make changes was also extremely time consuming. The default Arduino IDE is designed to have everything in one file. I had 20 files, not including the Robot Operating System code.
On my previous laptop I had Microsoft Visual Studio and after the competition last year tested out the Visual Micro Arduino plugin with some success. If you have Visual Studio, I’d try that first. However, my new laptop does not have Visual Studio and I no longer qualify for the academic version. It seemed rather wasteful to buy Visual Studio for this one project. The best-known open source alternative is Eclipse, so I thought I would give it a try.
There are some rather involved and outdated instructions on integrating Eclipse with WinAVR on the Arduino site. There is also an Arduino eclipse plug-in. It was pretty clear that this wouldn’t be as polished as Visual Micro but I figured it was worth a shot.
Installing the Arduino Eclipse plug-in is not for the faint of heart. A couple of tips if you decide to try it:
- Put Eclipse in a directory with no spaces — NOT Program Files.
- Put the Arduino environment in a directory with no spaces too. Confirm that you can use the Arduino IDE to compile and upload a simple program.
- Eclipse suggests a workspace directory. ACCEPT IT. If you go elsewhere, Windows 7 in particular may not let you write there and this causes all sorts of problems. This is especially true as the first time you use a particular board combination the plug-in will try to create a separate project for that board so that you can link to its static library.
- If you use an Arduino library, you must Import it, not just add a reference to it.
- The plugin instructs you to set certain Arduino files to be indexed up front. This is not possible in the latest version of Eclipse. Therefore functions like Serial will all be highlighted in red as “undefined” even though the build may work. To fix this problem, index manually and/or add the path to Arduino.h manually.
- The very first time you create an Arduino sketch, you must have the board plugged in, as otherwise you won’t have a COM port to choose from and the configuration cannot be completed.
- If you have to start over and re-install Eclipse — which I had to do about 5 times, not knowing everything here — you must completely delete Eclipse, the workspace directory, and any .eclipse or Eclipse directory in the Documents or Users area.
Painful as this was, the results were worth it. Eclipse is quite a nice IDE, and to be able to see the first lines of function code simply by moving my mouse over a reference to it, navigating to an object’s source file with one click, and finding all uses of a a particular variable or function, are tremendous productivity enhancements. The build process also found a serious bug right away (don’t ignore those warnings!). I have successfully compiled and built code to the robot with this. The only key tool I haven’t tried yet is the serial monitor, because the plugin website does not have written instructions on that. After downloading a 32M video file, it appears you pull it up via Window -> Views -> Other -> Arduino -> Serial monitor. I do prefer written instructions, but hey, this is free software.
Easier physical connection to the Arduino board
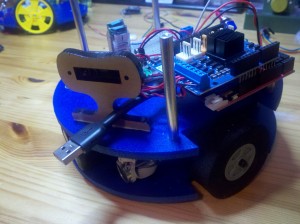
To update the robot’s software, it’s necessary to connect a USB cable from the Arduino to the computer. The Arduino sits under the motor shield and behind an IR sensor and quite a few wires. Snaking the USB cable in was a bit of a pain. At Abingdon someone suggested using a very short USB cable left connected to the Arduino, then using a USB extender as needed to connect that to the computer. This works nicely.

USB short cable plugged into the Arduino. When the robot is fully assembled this platform is underneath another and harder to reach.
Another hassle was the XBee. We need this to be connected for teleoperation and for Serial debugging when the robot is running disconnected from the computer. However, to upload new Arduino code it is necessary to unplug the XBee from the Arduino or the upload won’t complete. I intend to put in a switch, instead of pulling the wires each time.
Simpler circuits
Instead of using my home-built high-side switch to turn on the fan, I will use the ULN2803s I ordered when writing my post on adding power and pins to the Arduino. It’s conceptually simpler, and safer (my other version did not have kickback diodes). I’m not sure why I didn’t do this before, I simply didn’t remember it. That’s sleep deprivation in action.
I never built a sound activation circuit last year, but I had ordered individual components and started wiring them to a breadboard — quite a few components, and messy. Since then I’ve found a simpler audio circuit that uses an LM567, which I now have and will use instead.
It is nice to be able to work at a more relaxed pace and hopefully do more things right this time.


[…] Back when I was working on my firefighting robot, I wanted a better system than the default Arduino IDE (integrated development environment). With dozens of files and thousands of lines of code to manage, a professional development environment became highly desirable. I blogged previously about moving my Arduino code into Eclipse. […]