Making a robot go straight
If you create a mobile robot with a job to do, at some point you will be faced with the need to get it to a specific location. Firefighting competitions require the robot to navigate a known maze. Much of my limited time last year was spent trying to get FireCheetah to do the supposedly simple task of driving in a straight line. Sounds easy, right? For a differential drive robot with two wheels, just deliver the same torque to each wheel.
As it turns out, this obvious method doesn’t work very well. My robot did fine when I could hug a wall using sensors, which is most of the maze. Eventually, though, there are spots where it has to manage on its own. And there my robot had two big problems:
- It drifted left substantially, and
- On smooth floors it would skip to a stop, meaning that the final position was unpredictable
It was a maddening problem. Sometimes the robot would go where I wanted…and sometimes not. I tried a few things. I added a fudge factor to the motor voltages so the left side would go a bit faster. I tried a PID controller to even out encoder ticks — distance travelled — on the right and left side. I reduced the motor voltage, and therefore velocity, to minimize the skidding. But I couldn’t go too slow because I knew there would be carpets and the robot would not be able to move if the torque was too low. Heaven help me if I stalled the motors, because then the robot would be really unpredictable for the next hour. All in all not a situation to inspire confidence, and I knew going into the competition that I was unlikely to succeed in the autonomous task. (We were ultimately done in by an unrelated software bug introduced at the last minute.)
This year I was determined to solve the navigation problem early on. One step was upgrading the motors. These also came with better encoders, devices that tell you how much the engine shaft has rotated, and therefore how much the wheel has rotated. Ignoring slip, this gives you distance traveled. However, this did not solve the problem by itself — the robot still drifted left.
Time to put in some better software! My original code was loosely based on Mike Ferguson’s code for Crater, a winner at Trinity. He was dealing with far more limited processing power — he had an Atmel 168, I have a Mega — and so he had no PID of any kind. And indeed, in a fancier version of Crater he noted the problems with keeping the robot straight. I thought the answer might lie here.
As luck would have it, Coursera’s Control of Mobile Robots started up, and one of their examples gave me the solution. I am going to summarize it here, along with some extra details, for anyone with a differential drive robot. I won’t use their slides though, as they used a horribly confusing notation (sometimes v is angular velocity, sometimes linear, on the same page). Instead I recommend the following tutorial on differential drive kinematics. From there we get
where sr and sl give the displacement (distance traveled) for the left and right wheels respectively, b is the distance between wheels (from center-to-center along the length of the axle), and theta is the angle of the robot’s heading with respect to the x-axis.
With this equation in hand, we can rewrite our PID controller with the aim of controlling theta, the robot’s heading. In my case I simply used the proportional term. I chose a rational sampling speed based on expected period of encoder ticks. Almost instantly, the robot could drive straight! It was magical.
Along with this, I used PID for the overall linear velocity. That way I can move at the same moderate speed on all surfaces. The robot moves smoothly on a hard floor — and bumps up the torque to maintain that speed when it hits the carpet.
In the spirit of Mike Ferguson and other people who have shared their code, I am putting my libraries on GitHub so others can use them. I am not going to post the link just yet however, as they are under “active development” to put it mildly…
Physical reality intrudes
After delighting in these new capabilities for a few days, suddenly the robot stopped moving as reliably. This was a terrible time. I thought I might have introduced a software bug. Eventually I traced it back to my Faulhaber motors. These come with right-angle gearboxes and some of the set screws had gotten loose. This meant the motor shaft was turning but the wheels weren’t, or not always. Once the set screws were tightened, the robot behaved well again. This did point out one disadvantage of integrated encoders — I love them, but the external ones look at the wheel rather than than the motor shaft, and wheel rotation is really what we care about.
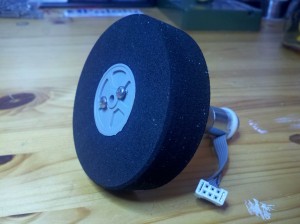
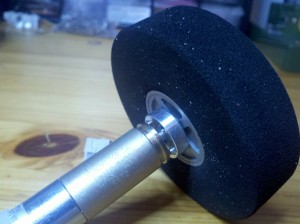
The gearboxes effectively extend the motor shaft, but are otherwise useless and add potential mechanical issues, such as play in the gears. I removed them from a pair of motors, which left only 3mm of shaft extending. However I found some narrow Polulu universal hubs that fit, and drilled holes in a pair of Lite-Flite wheels to attach them. The final product looks like this:
 |
 |
These have passed some simple tests but are not yet attached to the base. The base needs some reworking as well. I am using a platform from Budget Robotics which puts the wheels in the middle, and that means two casters for front and back. This platform was originally designed for a robot with skids and few motion requirements. Experimenting with some carpet samples has reaffirmed the principle that “three points make a plane” and it would be better to have only one caster — otherwise, it is easy for a wheel to get lifted off the floor and once that happens you are utterly dead. The robot thinks that side has moved when it hasn’t and the odometry is completely wrong. So I am going to attach the wheels further back on the robot, and cut off part of the base to do it.
Next steps
Although navigation is much improved, I do not plan to rely on dead reckoning. There are the carpets to worry about, and more fundamentally, a robot should use its sensors to adapt to the environment. FireCheetah has quite a few sensors and used properly should be capable of some robust recovery behavior. I will go through and confirm that “normal” navigation through the maze works — then time to have fun knocking the robot sideways and let’s see if it can get back on track.

Erica,
Did you ever post your code? I’m looking into various ways to control a robot to move in a straight line for long distances, like 200 to 500 feet.
Hi Jim, the code link is at https://github.com/eschulma/robot-libraries-arduino. It’s not “officially” done but I think it should work for you.